Lead Work North Devon
SNR Roofing covers all aspects of lead work, including Flat and pitched roof covering, Lining parapet and valley gutter, Flashings and soakers, Dormer and bay window covering, Valleys and gullies, Made to measure custom units for builders or developers.

Expert Lead Work Services for Your North Devon Home or Business - Guaranteed Quality and Durability
Lead work is an essential component of any roofing system, as it protects your home or business from water damage. At SNR Roofing, we understand the importance of quality and durability when it comes to lead work. Our expert team is skilled in all types of lead work, including flashing, guttering, and chimney repairs. We are based in North Devon and can provide our services to customers in the surrounding areas. Contact us today to schedule a consultation and see how we can help keep your home or business protected.
Professional Lead Work Services.
Lead work not only serves as an essential component to keep your home or business protected from water damage, but it can also enhance its aesthetic appeal. Our team of skilled professionals are dedicated to providing quality and durability that will last. Not only you will have peace of mind knowing that your property is protected, but also will have an enhanced look.
Lead Work
What lead work services
do you provide?
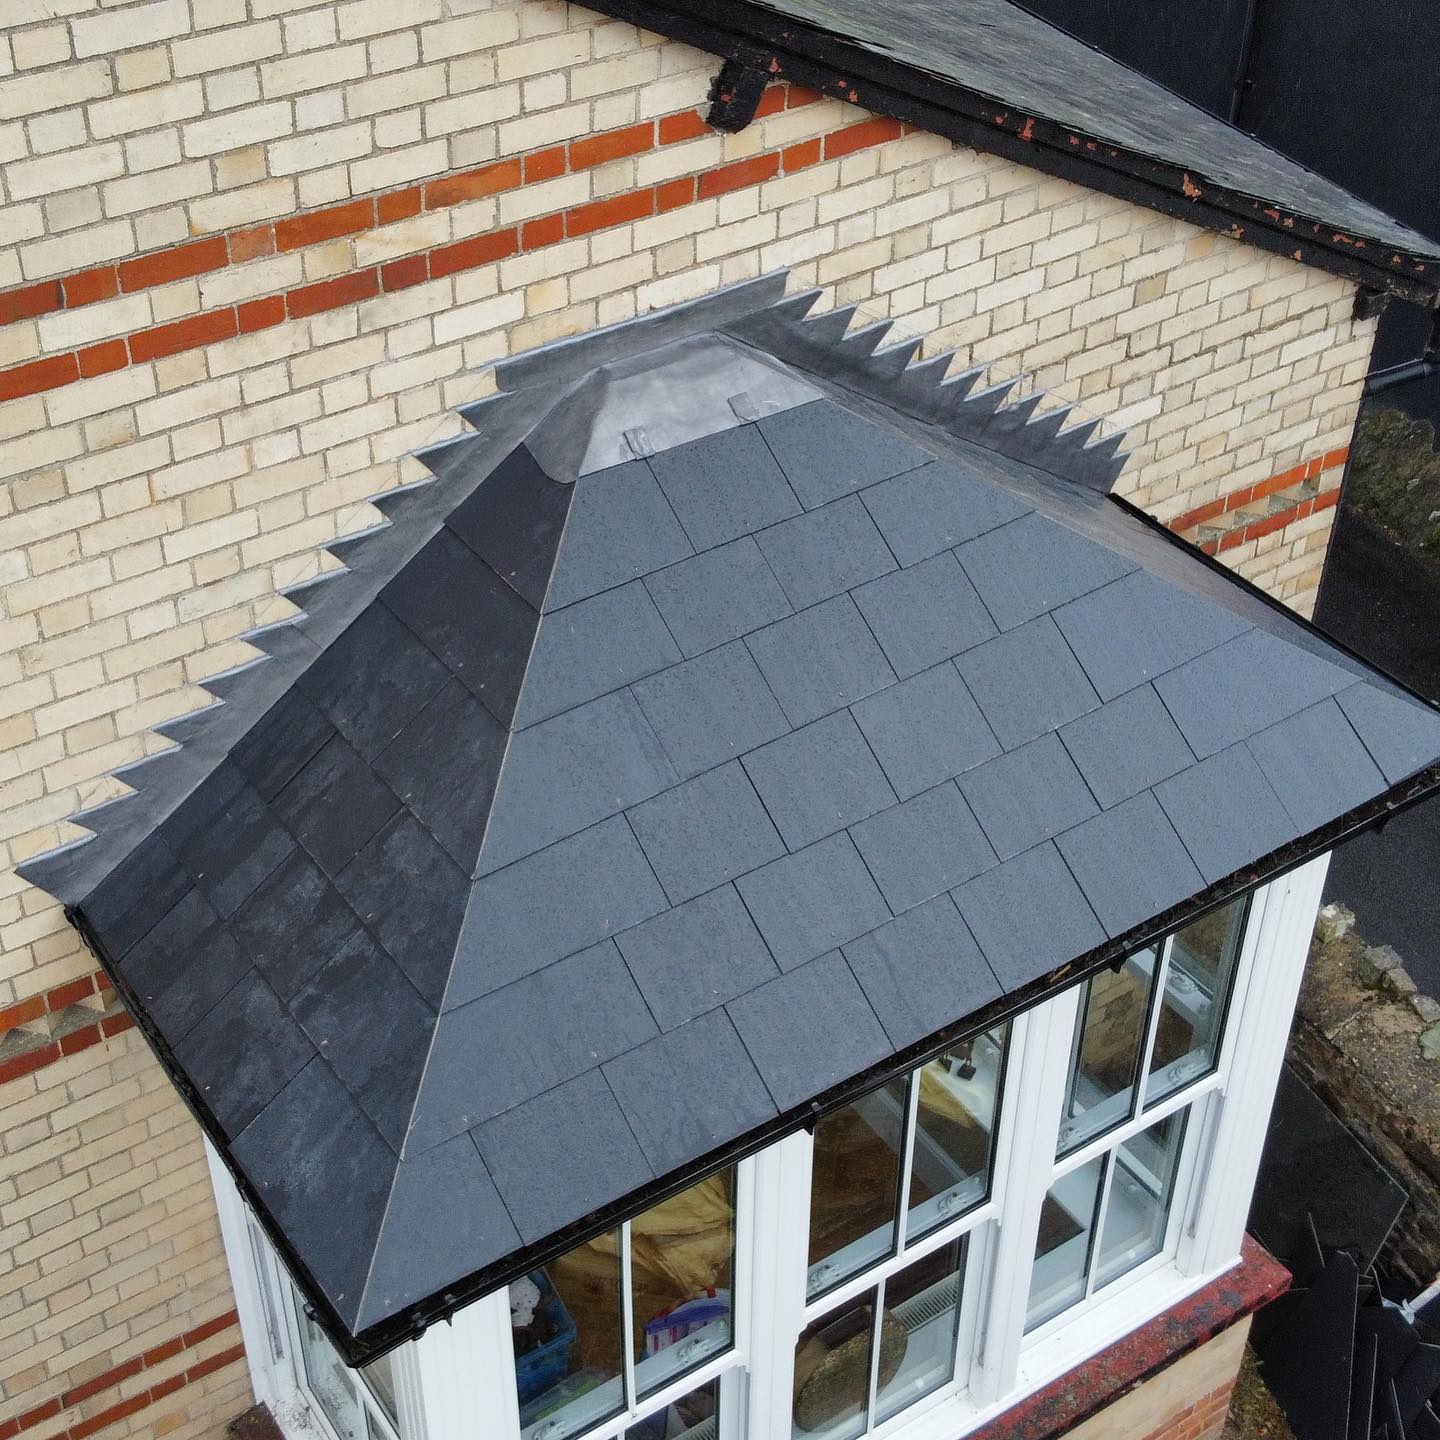
Lead flashing
This is used to seal the joints between different parts of the roof, such as where the roof meets a wall or chimney.
Lead flashing
Lead flashing is a process used to seal the joints between different roof parts, such as where the roof meets a wall or chimney. The purpose of lead flashing is to prevent water from penetrating the roof and causing damage to the building.
Here is the general process for installing lead flashing:
- Measure and cut the lead to the appropriate size and shape.
- Clean and prepare the surface where the lead will be installed. This may include removing old flashing or any debris that could interfere with the installation.
- Install a base flashing, which is a strip of lead that covers the lower portion of the joint. This helps to direct water away from the joint.
- Install the main flashing, which covers the rest of the joint. The main flashing should overlap the base flashing and be secured with nails or other fasteners.
- Install counterflashing, a strip of lead or other material covering the joint’s upper portion. The counterflashing should overlap the main flashing and be secured with nails or other fasteners.
- Seal the joints between the different flashing pieces with a waterproof sealant to ensure a watertight seal.
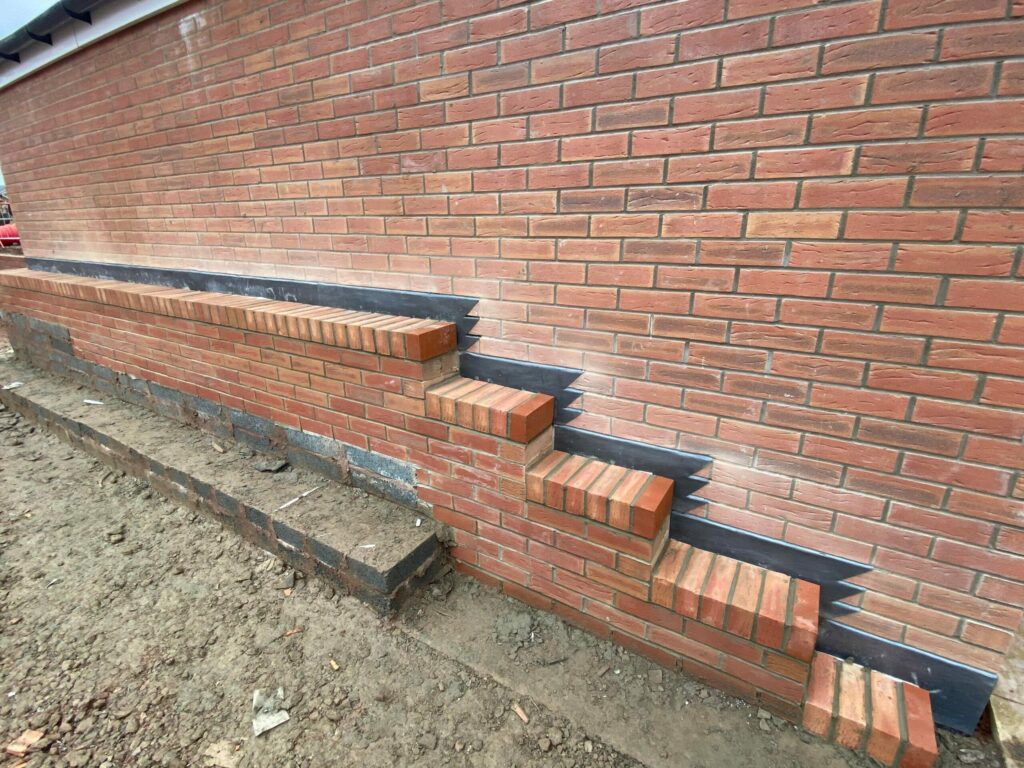
Lead sheeting
This is used to cover large areas of the roof, providing a durable, watertight surface.
Lead sheeting
Lead sheeting covers large roof areas with lead, providing a durable, watertight surface. Lead sheeting is often used on flat or low-sloped roofs, as well as on walls and other vertical surfaces.
Here is the general process for installing lead sheeting:
- Measure and cut the lead sheets to the appropriate size and shape.
- Clean and prepare the surface where the lead sheets will be installed. This may include removing debris or old roofing materials that could interfere with the installation.
- Install a base layer of lead sheets overlapping the sheets by at least 50mm (2 inches) to ensure a watertight seal. The base layer should be secured in place with nails or other fasteners.
- Install additional layers of lead sheets as needed, overlapping the sheets in the same way as the base layer.
- Seal the joints between the different lead sheets with a waterproof sealant to ensure a watertight seal.
Lead gutters and downpipes
These are used to collect and channel rainwater away from the roof and the building.
Lead gutters and downpipes
Lead gutters and downpipes collect and channel rainwater away from the roof and the building. Lead gutters are installed along the edges of the roof, and downpipes are installed along the walls of the building to carry the water from the gutters to the ground.
Here is the general process for installing lead gutters and downpipes:
- Measure and cut the lead sheets to the appropriate size and shape for the gutters and downpipes.
- Clean and prepare the surfaces where the gutters and downpipes will be installed. This may include removing debris or old roofing materials that could interfere with the installation.
- Install hangers or brackets to support the gutters. The hangers or brackets should be spaced at regular intervals along the gutter’s length and secured to the roof or wall with screws or other fasteners.
- Install the gutters by attaching the lead sheets to the hangers or brackets. The gutters should be level and slope slightly towards the downpipes to ensure proper drainage.
- Install the downpipes by attaching the lead sheets to the wall of the building. The downpipes should be secured in place with brackets or other fasteners.
- Seal the joints between the different pieces of lead with a waterproof sealant to ensure a watertight seal.
Lead soakers
These are used to cover the tops of timber rafters, providing a waterproof barrier and protecting the rafters from weathering.
Lead soakers
Lead soakers cover the tops of timber rafters, providing a waterproof barrier and protecting the rafters from weathering. Lead soakers are commonly used on pitched roofs and installed under tiles or other roofing materials.
Here is the general process for installing lead soakers:
- Measure and cut the soakers’ lead sheets to the appropriate size and shape.
- Clean and prepare the surface where the soakers will be installed. This may include removing debris or old roofing materials that could interfere with the installation.
- Install the lead soakers by attaching them to the tops of the timber rafters. The soakers should be secured in place with nails or other fasteners.
- Seal the joints between the different pieces of lead with a waterproof sealant to ensure a watertight seal.
Lead aprons
These are used to cover the base of a chimney, protecting the chimney from water damage.
Lead aprons
Lead aprons are used to cover the base of a chimney, protecting the chimney from water damage. Lead aprons are typically installed on pitched roofs, positioned under the tiles or other roofing material.
Here is the general process for installing lead aprons:
- Measure and cut the lead sheets to the appropriate size and shape for the aprons.
- Clean and prepare the surface where the aprons will be installed. This may include removing debris or old roofing materials that could interfere with the installation.
- Install the lead aprons by attaching them to the base of the chimney. The aprons should be secured in place with nails or other fasteners.
- Seal the joints between the different pieces of lead with a waterproof sealant to ensure a watertight seal.
Lead dormer and bay window coverings
Provide a watertight seal around the edges of dormer windows and bay windows, protecting the building from water damage.
Lead dormer and bay window coverings
Lead dormer and bay window coverings provide a watertight seal around the edges of dormer windows and bay windows, protecting the building from water damage. Lead is a common material used for these coverings because it is durable and can be shaped to fit a wide range of sizes and shapes.
Here is the general process for installing lead dormer and bay window coverings:
- Measure the size and shape of the dormer or bay window to determine the size and shape of the required lead coverings.
- Cut the lead sheets to the appropriate size and shape using lead shears or a lead knife.
- Install a base flashing, a strip of lead covering the window’s lower portion. This helps to direct water away from the window.
- Install the main flashing, which covers the rest of the window. The main flashing should overlap the base flashing and be secured with nails or other fasteners.
- Install counterflashing, a strip of lead or other material covering the window’s upper portion. The counterflashing should overlap the main flashing and be secured with nails or other fasteners.
- Seal the joints between the different flashing pieces with a waterproof sealant to ensure a watertight seal.
Custom Lead units for builders and developers
Allows the exact size and shape of lead required for your roofing projects.
Custom lead units for builders and developers
At SNR Roofing, we provide custom lead units for builders and developers, as this allows the exact size and shape of lead required for your roofing projects. To create custom lead units, we follow these general steps:
- Measure the area where the lead units will be installed to determine the size and shape of the needed units.
- Cut the lead sheets to the appropriate size and shape using lead shears or a lead knife.
- Join the pieces of lead together using lead welding or lead soldering.
- Smooth and finish the lead units as needed, using a lead screed or a lead file.
- Install the lead units according to the manufacturer’s instructions and best practices for lead work.
15 Years Experience
Using our 15 years of experience, we will provide advice and a quotation for roofing project.
Certified
Our roofing company's CHAS and CITB accreditation showcases our commitment to safety and industry standards.
5-Star Testimonies
North Devon residents trust our roofing services, as evidenced by their glowing 5-star testimonials.
Local Company
North Devon-based, our roofing company serves South West region, offering local expertise and personal service.
Questions and Answers
Your Questions Answered
What are the benefits of lead work for my property?
Lead work is an essential component of any roofing system, as it helps to protect your property from water damage by directing water away from the building. Additionally, lead work can also enhance the aesthetic of your property. The use of lead for flashing, guttering, and chimney repairs can add a classic and timeless look to your property, Lead is also very malleable material making it easy to work with, thus making it a great material for intricate and complex designs, it has a low melting point and can be easily shaped to the contours of your property, ensuring a perfect fit and optimal performance. Lastly, lead work is a durable and long-lasting material that can withstand the elements and last for many years. At SNR Roofing, we use high-quality materials and offer written guarantee on our services, ensuring that our customers receive the best.
Is lead work expensive?
The cost of lead work can vary depending on the specific services required, the condition of the existing roofing and the size of the project. Generally, lead work is considered a higher-end roofing option due to the materials and labor required, but the cost can be justified by its long lifespan, low maintenance and protective capabilities.
At SNR Roofing, we offer competitive pricing for our lead work services and can provide a detailed estimate for any project. We use only high-quality materials and employ skilled and experienced professionals, ensuring that our customers receive the best value for their investment. Additionally, our services are guaranteed and many of our satisfied customers recommend us and share their experiences with others. Contact us today to schedule a consultation and we will provide you with a quote for your specific needs.
What is lead work?
Lead work refers to the installation and repair of lead-based products on a roofing system. This typically includes the use of lead flashing, which is used to direct water away from the building and prevent leaks, lead guttering, which is used to ensure proper drainage and prevent water damage, and lead chimney flashing, which is used to prevent leaks and ensure proper ventilation. Lead work can also include the installation of a full lead roof, Lead valleys and soakers. These services are essential for protecting a building from water damage and ensuring proper functioning of the roofing system. At SNR Roofing, our team of expert tradespeople are skilled in all types of lead work, using traditional methods and techniques. We employ high-quality materials and guarantee our services to provide our customers with the best possible protection for their home or business.
Is lead still used on roofs?
Yes, lead is still commonly used on roofs today, particularly for certain types of roofing systems such as flat roofs, heritage buildings and churches. The flexibility, durability and longevity of lead make it a suitable material for many roofing applications. Lead is particularly well-suited for flashing, guttering and chimney work, as its malleable properties allow it to be shaped and molded to fit seamlessly into the contours of the roof, making it a great option for custom installations. Lead also offers excellent weather resistance, fire-resistance and is easy to maintain, which helps to ensure its longevity. Additionally, lead is a sustainable material, as it can be recycled and is environmentally friendly. At SNR Roofing we provide lead work services using traditional methods and techniques, ensuring that our customers receive the best possible results.
Our Recent Lead Work Projects


What people say
Client Testimonials

Protect your property and enhance its aesthetic appeal with expert lead work services from SNR Roofing.
Our team of skilled professionals specialises in flashing, guttering, and chimney repairs and will work with you to customize a solution that meets your needs. Trust us to use only high-quality materials and provide a written guarantee on all our services. Don’t wait any longer and contact us today to schedule a consultation and see how we can make your property shine
